Nomad series: Tracing how a Connext cross-chain swap transaction works from the source to destination chain

Note: This blog cover cross-chain swap in the Connext testnet as of July 2022. Amarok upgrade may not be fully applied yet.
In this blog, we will show the complete flow from the Connext bridge UI to the underlying transaction detail on the blockchain.
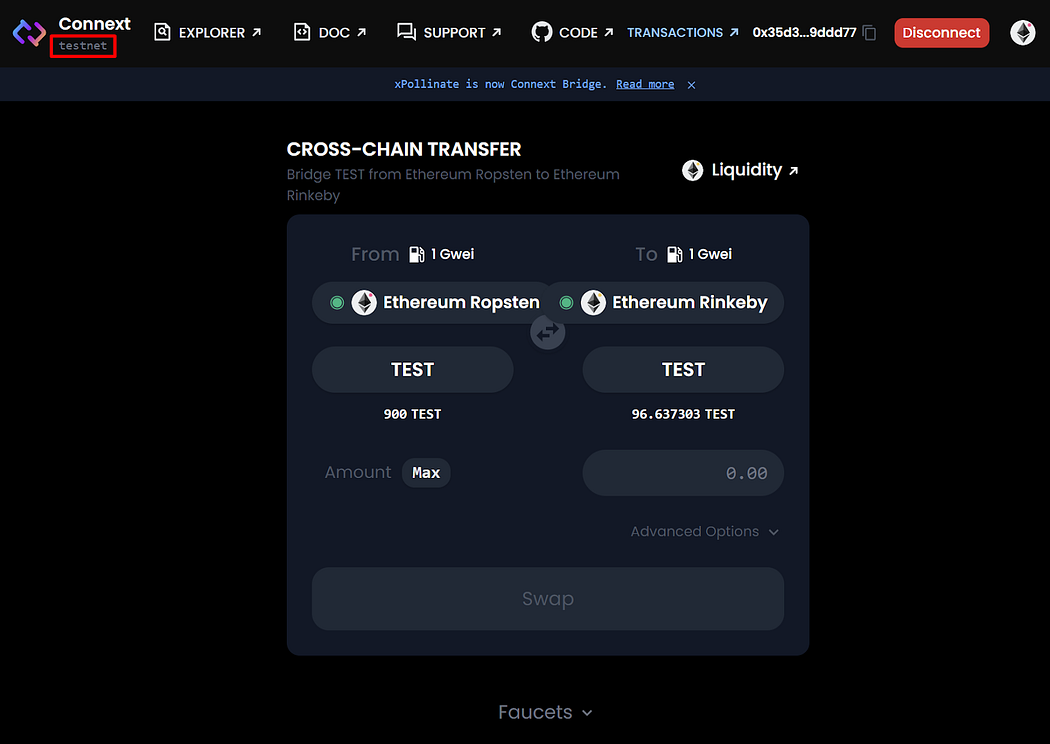
To begin, you must switch your network in Metamask to any Ethereum testnet. Then, you can access Connext bridge testnet dApps at https://testnet.bridge.connext.network/. Note that this isn’t the same site as the mainnet one. You can notice the difference in the logo in the left-top corner of the webpage. It should show the “testnet” label there.
In testnet, a few tokens are supported (Currently TEST and GTH tokens). To get some TEST tokens, you must request them from the faucet. We will cover this in the next section.
Request Connext bridge testnet faucet
To request the TEST token from the faucet, press the “Faucets” dropdown at the bottom of the page. It will automatically enter your wallet address and select the chain. You must press the “FAUCET 1,000 TEST” button and confirm the transaction in your Metamask.
Connext cross-chain transfer UI
To bridge your tokens to another chain, switch your Metamask to the desired source chain, select the destination chain, select the token and enter the amount. After that, wait 10 seconds for the system to calculate the routes. The UI will show the fee and estimated received as a loading indicator during calculation.
After a route has been calculated, fees and estimates received will be shown in the UI. You need to double-check the amount before executing the transaction. You may enter additional options as you wish. After that, in case you haven’t approved the router yet, press the “Approve” button. Then, press the “Swap” button. The system will show the confirmation dialog to let you double-check again before executing the transaction.
Connext cross-chain transfer advanced options
There are many advanced options in the Connext bridge UI. We will discuss each option below:
- Allowance: You can switch between “Exact” and “Infinite” allowance. If you choose “Exact,” once you press the approve button, it will only approve what you have entered in the source chain amount field to the transaction manager. On the other hand, if an “Infinite” allowance is selected, it will approve an infinite amount of your selected token to the transaction manager. The default option is “Exact,” as it has more security than the “Infinite” option to prevent a hacked transaction manager from stealing your funds. This aligned with the security-first concept of Nomad.
- Receiving address: Connext will unlock the fund in the destination chain to the same wallet that locks the fund in the source chain by default. You can specify the receiving address to receive funds in different addresses.
- Contract Address: Contract address to execute the message on the destination chain. This is a part of arbitrary message passing. In case you don’t need it, you should leave it blank.
- Call Data: The call data or the message body to be sent to the specified contract address to execute a particular function on the destination chain. This is a part of arbitrary message passing. In case you don’t need it, you should leave it blank.
- Preferred Router: By default, Connext will automatically find the appropriate router for you. But if you need to fix the router to the one you intended, specify the router address here.
- Initiator: By default, Connext will automatically submit transactions such as fulfilling any claim by a managed external signer. If you need to do this independently, you can specify a custom initiator here.
Swap Confirmation
This modal confirmation shows receiving address, router address, send amount, fees, and estimated received. You must check for the final time before pressing the “Confirm” button to submit the transaction to the blockchain.
Anyone can explore the transaction on Connextscan. We use Connextscan to track any Connext cross-chain transaction.
The prepare transaction
The submitted transaction is called “prepare.” Prepare function in TransactionManager contract in the source chain will be called. The desired token will be sent to the TransactionManager contract and emit the token transfer and TransactionPrepared events.
This transaction will be forwarded to both Nomad and Connext. Connext’s sequencer will pick that transaction and forward the transaction to the router. Simultaneously, the Nomad sequencer will also pick that transaction and submit it to the destination chain. Connext’s router will instantly unlock the token on the destination chain after the user has signed to claim. Note that Connext may remove the signed-to-claim process in the future. In contrast, Nomad requires a 30 minutes fraud-proof waiting time before Nomad will unlock the token to the router.
Connext will automatically submit the “prepare” transaction to the destination chain once the sequencer has picked the transaction. This transaction is called the exec function in the ExecFacet contract. This function routes the required data to the Router and TransactionManager on the destination chain.
Signing to claim
Once the “prepare” transaction has been executed on the destination chain, the Connext UI will notify the user to “Sign to Claim Funds.” The signature request will be popped up on Metamask once the user has confirmed the signature request on the Metamask. The Connext will submit the fulfilled transaction.
This process contradicts the one described in the Amarok upgrade document. Amarok upgrade is said to remove the sign-to-claim process, but it is still there, as shown in the above screenshot from 2022–07–31.
Once claimed, Connext will change the status in the Connext scan on the destination chain to “Fulfilled.” Connext will submit the “fulfill” transaction to the chain.
The fulfill transaction
The “fulfill” transaction will unlock the token on the destination chain to the desired recipient address. It also emits multiple events, including token transfer, TransactionFulfilled and LogExecSuccess events. Connext will use these events to acknowledge the source chain back. Once acknowledged, Connext will submit another “fulfill” transaction on the source chain.
On the source chain, the “fulfill” transaction is submitted. If there aren’t any specific instructions for acknowledgment, It just emits the TransactionFulfilled event for the explorer and dApps to update the status.
On Connextscan, the transaction will be marked as “Fulfilled” on both the source and destination chain, which keeps the completeness of a cross-chain swap transaction on the user side.
The Nomad’s job
Although the user’s jobs have finished, the fund hasn’t been unlocked to the router. Once the 30 minutes fraud-proof period has been passed, Nomad will unlock the fund to the router. If this is processed one by one, it requires a tremendous gas fee. To optimize this, Connext aggregates multiple Nomad transactions and submits them as one transaction to save gas.
Summary
To begin, you can test the Connext bridge without using funds on the testnet at https://testnet.bridge.connext.network/. Connext bridge provides an easy-to-use user interface for cross-chain swapping. There are multiple advanced options, including the arbitrary message passing one. A confirmation dialog will allow you to double-check the amount before confirming the transaction. Once verified, you will submit a “prepare” transaction. Once Connext’s sequencer picks the transaction, the “prepare” transaction will be forwarded into the destination chain.
In some cases, Connext will ask the user to sign a signature to claim funds in the destination chain. After the user has signed the signature, Connext submits the “fulfill” transaction to the destination chain to unlock tokens from the router to the desired recipient. After a while, Connext acknowledged the source chain by submitting a “fulfill” transaction to the source chain, which marks the completeness of a cross-chain swap transaction on the user side. However, the router is still waiting for Nomad’s 30 minutes fraud-proof period. After this period is passed, Nomad will unlock the fund to the router.


